Selection of free softwares for the Indie-Filmmaker

This post was originally posted on the Raindance Website, and written by Christian Bell.

Money is, by definition, always a difficult issue for the low budget filmmaker.  The challenge is in getting as much of your meagre budget up on the screen as possible.  With that being the case do you really have the money to throw around on overpriced software packages?
Luckily, by the wonders of open source development, just about every £500 software package has its freebie equivalent.

These packages give you an entire office set up for every stage of the filmmaking process, from drawing up budgets and schedules, writing your script right through to advanced editing and special effects.  All for a most reasonable price.  Free.

Gimp – Equivalent to Photoshop

Photoshop is the worlds most pirated piece of software and for good reason.  It mixes an essential, practical and intuitive set of tools with an obscenely high price tag.  So if piracy is not your thing, then try out this brilliant, yet strangely named, free alternative.  Gimp’s impressive set of features rivals that of Photoshop and is expanding all the time.  The ability to open and save photoshop files also makes it very easy to jump back and forth.
Get it here

Open Office – Equivalent to Microsoft Office

Word and Excel, absolutely essential in running your office but at an annoyingly high price.  Not to mention the need to buy it all over again to run on a Mac.  So why bother?  Open Office has all the features of the Office package in a nicely familiar layout.  As a bonus it’s compatible with Mac and PC and can work with Microsoft files.  So long Bill Gates.
Get it here

Celtx – Equivalent to Final Draft

If you’re going to get anywhere as a writer then you’re going to have to make sure your scripts are properly formatted.  Final Draft’s £200+ price tag mocks the penniless writer, whereas Celtx welcomes him with open arms.  Celtx’s range of features is very impressive, functioning perfectly as an intuitive screenwriting package and also offers a complete scheduling and scene breakdown solution.
Get it here

windows movie maker, pinnacle videospin

These lightweight freebie editors should not be overlooked entirely.  For quick edits and changes there’s no need for the big guns.
Get Windows Movie Maker
Get Pinnacle Videospin

HyperEngine-AV – Equivalent to Adobe Premiere, Final Cut Pro

A decent editing package.  A step up from the likes of imovie though still not up to the professional standards of the pricey packages.  For simple edits though, you could do a lot worse.
Get it here

Inkscape – Equivalent to Adobe Illustrator

When creating titles and logos, you are going to need to use vector graphics.  Once upon a time that meant the man from Adobe ransacking your pockets.  Not anymore.  Inkscape does it all.
Get it here

kompozer – Equivalent to Dreamweaver

You are going to need a website and you are probably going to want to put your own one together rather than relying on well worn template tools like wordpress.  Kompozer can do it all.
Get it here

Blender – Equivalent to Maya, 3DS Max

The big 3D modelling and animating packages will set you back thousands of pounds, a price that sets a solid barrier against the beginning 3D modeller.  How are people able to learn to use it?  The answer is Blender.  The results that Blender has produced are truly stunning and it has already been used to create effects for feature films as well as animated shorts.  There is a heavy reliance on shortcut keys which makes it a very steep learning curve for beginners.
Get it here

Avid Free DV

This was a great idea but has sadly been discontinued by Avid.  Avid Free DV is a free version of their high end editing software, preserving the interface but removing many of the advanced features.  Great for simple editing whilst also learning your way around Avid.  Copies are still floating around online, though now it’s unsupported it is just going to get more out of date with time.  Get it while it’s still useful.
Get it here

Cinepaint

Perfect for finalising your film.  Cinepaint allows you to do a careful retouch of your footage, frame by frame, or just clean up still images.
Get it here

Jahshaka – Equivalent to After Effects

You’re heading into complex territory here.  Recently renamed CineFX, Jahshaka aims to be a one stop visual effects suite.  While Jahshaka does have an impressive feature set, it is possibly too unreliable and glitchy for use on larger projects, but for simple effects you can’t go wrong.
Get it here

Avidemux

One of the best free editing packages out there.  Avidemux allows you to do basic cutting, apply filters and work with a wide variety of different file types.  It gets better with each release.
Get it here

ffmpeg

A powerful encoding tool that can read and convert just about any video file format.
Get it here

MPEG Streamclip

Another powerful, porfessional encoding and conversion tool.  It accepts even the most obscure video formats and can even download YouTube videos.
Get it here

MediaInfo

I only just discovered this one and am now not entirely sure how I coped without it.  Mediainfo opens any video file and tells you exactly what codecs and settings were used to create it.  Essential.
Get it here

VLC Player

The video player that plays everything.  Essential.
Get it here

Audacity – Equivalent to Pro Tools

Your film is going to need a great sound mix if it’s going to stand up to the professionals.  To get this done you are going to need the powerful tools that Audacity provides.
Get it here

DVD Flick

A simple DVD authoring solution that allows you to work with multiple formats, add subtitle streams and create menus easily.
Get it here

Seashore

Lighter on features than Gimp but a lot less clunky.  If you just want to do a basic image touch up then give this a shot.
Get it here

KOffice

An impressive collection of software, the KOffice project is similar to Open Office in many respects but has a couple of extras thrown in too.
Get it here

Synfig – Equivalent to Flash

Whether you’re looking to create simple web animations or looking for a program to animate film quality images then Synfig is for you.  Offering much of Flash’s feature set as well as tools entirely of it’s own making, Synfig provides an outlet for the budding 2D animator.
Get it here

Skype – Equivalent to expensive international calls

It’s a wonder anyone is paying the extortionate rates of international phone charges anymore.  Get Skype, talk cheap.
Get it here

About The Author


A graduate of the Metropolitan Film School, where he made short films about tortured misunderstood artists, Christian now devotes his time to the Raindance cause in the hope that he can somehow make amends for his crimes against cinema.

He spends all too much of his time watching films no-one has ever heard of and then preaching the word to all who will listen.

The rest of the time, Christian is an editor and he has recently launched Raindance’s new Post-Production Services.

Links

http://www.raindance.org http://www.united-creative-artists.co.uk

Posted in editing, film, Film tips, films, free software, freebies, indie, Indie Filmmaking, Uncategorized | Tagged , , , , , , , | Leave a comment

DSLR cinematography guide, 7D and 5D Mk2 and similar cameras.

Digital cinematography is changing so rapidly these days that a printed book on the subject will likely be outdated by the time it reaches store shelves; this is especially true when it comes to the rapid release cycle of DSLRs.

DSLRs (often called HDSLRs or VDSLRs now) are a great enabler on the “no film school” front, as they are priced to own and allow aspiring filmmakers to follow the “buy a camera and learn” lesson plan. But as with any creative tool, a DSLR is only as good as the person using it — because, while these cameras offer a world of advantages, they also come with a considerable set of drawbacks. However, these drawbacks are worth dealing with in order to get the kind of amazing images possible with an imaging sensor that has twenty to thirty times more surface area than that of a similarly priced, dedicated video camera. To emphasize: these cameras are not designed to shoot movies. Their primary function remains to shoot still photos, but it just so happens that they shoot amazing video very inexpensively, and for that they are worth tinkering with, hacking, and jumping through a number of hoops to use. And make no mistake: to modify these still cameras to behave like “real” movie cameras, there are a lot of hoops to jump through (thus the length of this guide), but you will be rewarded by using a camera that many of us could only dream of a few years ago, for cheaper than any of us imagined.

This guide assumes some basic knowledge of moving images, such as exposure, shutter speed, focal length, and frame rate. It focuses on the technical challenges unique to DSLR cinematography — it won’t teach you how to light scenes, stage camera movements, or cook a full English breakfast. It will, however, give you a huge jump start in figuring out how to make beautiful, inexpensive movies using a DSLR.

The vast majority of the following content comes from terrific user forums like DV Info, Cinema5d, DVXuser, REDuser, and Creative COW; news sites like FreshDV and Pro Video Coalition; and noted DSLR users like Philip Bloom, Dan Chung, Vincent LaForet, Jon Fairhurst, Stu Maschwitz, and Shane Hurlbut (not to mention firmware luminary Tramm Hudson) was compiled by NoFilmSchool , an excellent website for indie-Film-makers like us, and edited by JC Leger.

1. Choosing a DSLR

The main thing to understand while reading the following comparison is how DSLR sensor size affects the images the camera produces. Larger sensors aren’t always better, but for our purposes it’s easiest to think of larger sensors as capturing images that have a shallower depth of field, greater dynamic range, and better low-light sensitivity. Here is a chart of DSLR sensor size:1

CMOS Sensor Size of DSLR HDSLR VDSLR Cameras Canon T2i Canon 5D Mark II Canon 7D Canon 1D Mark IV Nikon D3s Panasonic GH1 APS-C APS-H Full Frame Micro 4:3As you can see in the chart, Canon and Nikon’s implementation of APS-C is slightly different, but not enough to make a practical difference. For comparison’s sake, I’ve included the $9,000 Sony EX-3 professional video camera in the chart — you can see how much larger all of these DSLR sensors are, which is the chief reason why DSLRs are such a disruptive technology. With this in mind, let’s take a look at the top DSLRs for filmmaking:

Canon 5D Mark II

Canon 5D Mark II HDSLR DSLR VDSLR

Strengths: In my opinion, thanks to its full frame sensor the 5D produces the smoothest, most beautiful images of them all (this should be written out four times because this factor far outweighs the others… ) Also due to the sensor size, the 5D is the friendliest of the Canon DSLRs for using old SLR lenses (you don’t have to deal with crop factors). Thanks to a firmware update, shoots at 1080p/24p as well as 30p. Also has manual 48KHz audio. Good build quality. Shoots terrific stills.

Weaknesses: HDMI output drops to 480p the moment you hit record; this is terrible for using field monitors (not so much an issue if you’re planning on using a LCD viewfinder). Footage starts to get noisy from heat without the camera telling you it’s overheating. Full frame sensor can be an issue if you want to adapt cine lenses, which don’t cover the almost VistaVision-sized sensor. No 50p or 60p which means you can’t get great slow-motion footage from the camera. Full frame sensor means your depth of field is so shallow that it can be difficult to pull focus.

Canon T2i (a.k.a 550D)
Canon t2i HDSLR DSLR VDSLR

Strengths: A great deal — it’s basically the same camera as the 7D (see below) for less than half the price. Cinema-sized APS-C sensor size with lots of recording options: at 1080p, 24p/25p/30p; at 720p, 50p/60p (great for slow-mo work). Terrific LCD screen. Did I mention the T2i is a great deal? IMO it can’t be beat as a “first DSLR.”

Weaknesses: Not much weather coating, and not as good at shooting stills as some of the others (slower continuous shooting speed, no top LCD). HDMI-out drops to 480p during recording. Overheats easily. No manual audio control and no manual white balancing.

Canon 7D

Canon 7D HDSLR DSLR VDSLR

Strengths: Offers some advantages over its cheaper cousin T2i, chiefly that its HDMI-out stays at 1080i during recording. If you’re planning on using a field monitor, this is huge. The 7D is also crazily weatherproofed — video camera users will not be used to being able to leave a camera recording in rain and snow, but the 7D can handle adverse conditions with aplomb; something to keep in mind if you’re shooting in extreme conditions. Same sensor size and flexible video recording options as the T2i.

Weaknesses: More expensive than the T2i without offering a ton of upgraded features — it’s still priced very aggressively, and its price wouldn’t be considered a “weakness” if it weren’t for the cheapness of the T2i. Overheats easily. No manual audio control.

Canon 1D Mark IV

Canon 1D Mark IV HDSLR DSLR VDSLR

Strengths: Canon engineers applied some magic to the sensor and got some extra low-light performance out of the sensor (most famously demonstrated by Nocturne). APS-H sensor size splits the difference between Full Frame and APS-C, which can offer some interesting advantages (zoom lenses get a bit more reach and your lens kit effectively doubles if you’re pairing the 1D with a different camera because primes attain a different focal length on the 1D). Beefier batteries, beefier build quality.

Weaknesses: APS-H sensor splits the difference between Full Frame and APS-C, which can offer some interesting disadvantages (good luck finding good wide-angle lenses). No manual audio. More than twice as expensive as the 5D Mark II, yet has a smaller sensor.

Nikon D3s

Nikon D3s HDSLR DSLR VDSLR

Strengths: Full frame sensor just like the 5DmkII; the best low-light performer of them all thanks to A) the size of the sensor, B) larger pixels on the same size sensor (the D3s is 12MP instead of 21MP), and C) better noise reduction. If you’ve got a lot of Nikon lenses, you don’t need to mess with adapters. Probably the best camera in this roundup for taking still photos.

Weaknesses: Maxes out at 720p! Crappy MJPEG recording codec. 5-minute clip limit (Canons max out at 12 minute takes). Nikon engineers are still significantly behind Canon engineers when it comes to video and so the $5k Nikon DSLR trails the $800 Canon when it comes to resolution, codec, and frame rate options. No manual audio control.

Panasonic GH1

Panasonic GH1 HDSLR DSLR VDSLR

Strengths: Inexpensive. Offers 1080p at 24p and 720p at 60p (for North America; 25p and 50p for PAL countries). Articulating LCD screen and actually viable auto focus give shooters greater flexibility than the other DSLRs here. The GH1 also doesn’t line-skip like the Canons do which reduces or eliminates aliasing problems. I didn’t consider the GH1 to be a particularly viable camera for filmmaking because of its MJPEG codec, until it was significantly upgraded thanks to a brilliant hacked firmware that allows the codec bitrate to be raised from 17Mbit to 50Mbit. At such a high datarate the efficiency of the inferior MJPEG codec is much less of an issue; this singlehandedly transforms the GH1 into a viable moviemaking tool. DVXUser has some GH1/5D comparisons, from which users seem to favor the GH1’s image; I like the filmic look of the 5D much better, but the GH1 costs much less.

Weaknesses: Low-bitrate MJPEG codec is crippling if you’re not into the idea of installing unsupported hacked firmware on your $1k equipment. Not great in low light no matter what you do to the firmware. Micro 4/3 sensor won’t give you as shallow a DOF as the rest of the cameras here. No manual audio options.

// //

To summarize, I still like the Canon 5D Mark II as an all-around great DSLR (for both movies and stills) despite its quirks; once Canon added 24p and manual 48KHz audio via firmware update, the 5D became a much more viable tool for shooting, say, feature films. On the lower end the T2i is so much camera for the money that I can’t see a downside to owning one (even as a B cam to, say, a 5D). As the GH1’s hacked firmware matures, it will be interesting to see if it catches up to the Canons.

One could write an entire guide on choosing a DSLR, but that is a never-ending and ever-changing debate that I can’t resolve for anyone; each shooter’s DSLR choice comes down to availability, price point, and their own particular needs. Take into account the strengths and weaknesses mentioned above and also check out the forums for further info! Also, when budgeting for a camera package, assume the camera itself is going to make up a third (or less) of your overall expenses. This is just a rough rule of thumb, but if you have $8k to spend, don’t target a camera that costs $5k; consider a $2-3k camera body and then budget for lenses, tripod, audio equipment, etc. and see where you end up. While DSLRs are capable of capturing great moving images, they are by no means optimal for movie making in terms of features or ergonomics; thus a plethora of add-ons are necessary to make a DSLR behave like a “legitimate” movie camera. Unfortunately, much of the add-on market is targeted at accessorizing cameras that cost several times as much as a DSLR; when your camera costs $300k, it makes sense to spend $5k on a matte box; when your camera itself cost $3k, it’s a bit harder to justify. This guide focuses on finding quality equipment on a reasonable budget.

2. Rolling Shutter

Rolling shutter, known informally as jellocam, is a drawback inherent to large CMOS sensors. Yes, CMOS technology allows you to put a big-ass chip inside a relatively cheap camera (compared with a 3CCD approach), but with the good (Shallow depth-of-field! Low-light sensitivity!) comes the bad (Stuck pixels! Bayer filtering!) and the ugly (Jellocam!). Because large CMOS sensors scan top-to-bottom instead of all at once like CCDs, fast movements and pans can cause the image to appear to wobble.

Dealing with jellocam (same with aliasing) is all about knowing the enemy, and using the right tactics to avoid it.

Don’t expect to do any whip-pans with your DSLR, and don’t expect to shoot Blair Witch-style. Treat your VDSLR like a larger motion picture camera — better yet, attach some accessories and a third point of contact (more on this later) to make you treat it like a larger motion picture camera — and do planned, slow camera movements. This instruction alone, more than any technical nugget contained in this guide, will help your productions tremendously! Also be aware of strobe lights, flash photography, or lightning — such rapid changes of illumination can cause partial exposures, where half of the frame is bright and half of it is dark.

3.Overheating

// //

DSLRs weren’t designed to shoot video in a bona fide video production environment, so no matter which DSLR you buy, you’re likely to have overheating problems. This is when the DSLR’s operating temperature rises to the point where the camera either shuts down automatically, or the image becomes noisier due to the excess heat. This generally happens after several minutes of continuous shooting; in the case of the Nikon D90, the camera will just shut down and you’ll be unable to enter Live View mode until it has sufficiently cooled; in the case of the 5D the camera will allow you to shoot as it overheats but your image will become noisier due to interference from the heat. Overheating is an unfortunate side effect of getting a whole lot of camera for very little money, and the best solution is actually to get two camera bodies so you can shoot with one while the other cools. Or, if you’re on a major production, get 13 bodies. Other than that, there’s not a whole lot you can do to prevent it, except to take the camera out of Live View whenever possible, keep the shooting environment as cool as possible, and plan your production’s breaks accordingly. On staged productions where it’s a standard operating procede to cut often, DSLR overheating is not a deal-breaker; however, if you’re considering a DSLR to shoot interviews this is a major consideration as your camera will inevitably run into issues in the middle of an interviewee’s spielwhen the red flashing temperature icon appears, the camera will shut down.

Okay, enough about the drawbacks of shooting movies with HDSLRs! Remember you’re getting a camera that has a shallower depth of field and is more sensitive to light than anything else south of $20k! You’ve now been warned of the drawbacks, but as I said earlier: the hoops are worth jumping through.

4.Lenses: Using Primes, Choosing a Brand

One of the beauties of DSLR moviemaking is being able to change lenses.

With DSLR moviemaking, if you want your films to look like everyone else’s, use the stock lens. Fine. But the stock lens is not best suited for narrative filmmaking. It’s cool for documentary, but for a shallow depth of field and better low-light sensitivity, you’re going to want Prime lenses. Wait, let me stress this a bit more:

Primes!

// //

Primes are less expensive than more mechanically complex zoom lenses, and because they’ve been around for years, “buy used” has seldom been more true than when it comes to DSLR lenses.

New DSLRs come with autofocus lenses, which work great for still images, but in video mode they’re stuck using a contrast-detection method which is too slow to be viable; no one should be using autofocus on narrative films anyway. If you buy the camera with a bundled lens, you’ll get a solid all-around lens for taking still photos; however, if you’re on a tight budget and are mostly interested in shooting movies, you can skip the bundled lens, buy the body-only version, and spend the savings on used lenses. Here’s where the great advantage of “obsolete” technology comes in: there are thousands of manual focus-only lenses out there with a deflated value because of their relative uselessness on modern DSLRs — except when it comes to video mode, where they’re suddenly useful again. While you can’t beat good cine lenses, at this price point it’s a blessing to have so many interchangeable lenses available at bargain prices. Because many of these older manual lenses may not be up to the task of resolving 21 megapixels with aplomb, they don’t need to; in video mode, 1080p amounts to just shy of 2 megapixels, and any old halfway-decent SLR lens outstrips this resolution. For the web almost any SLR lens will be sharp enough, but if you’re planning on going to the big screen (theatrical, a festival run, etc.) then you’ll want to make sure you’re getting a sharp enough piece of glass.

When it comes to assembling a kit of lenses, most filmmakers like to choose a brand and stick with it, so the visual characteristics of the lenses match up from shot-to-shot; with the same brand lenses in your kit, the lenses will also handle similarly (some have dampened focus rings and true aperture rings, whereas others rely on the camera for aperture selection electronically and have looser focus rings designed for autofocus). Matching a lens brand to your camera — a common practice in the still world, and often a necessary one given the differences in lens mount electronics between manufacturers — is not nearly as important for video.2 And thanks to the widespread availability of quality, low-cost lens adapters (pictured right) that allow one manufacturer’s lenses to work with another’s camera, you don’t have to put Canon lenses on a Canon — you can generally interchange manual lenses at will with the right adapters. More on adapters in a bit, but first, let’s take a look at the particular characteristics of each lens brand, for which I’ll defer to DP Shane Hurlbut (Into the Blue, Terminator Salvation), who summarized them nicely on his blog:

  • Canon lenses “produce wonderful skin tones, have medium contrast and give you a wonderful gradation into the blacks.” The problem is, any recent Canon lens relies on the camera’s electronics to control the aperture (not a good thing; most camera operators, myself included, would rather have instant, tactile access to exposure controls), and older manual Canons are generally thought of as being slightly optically inferior to their Nikon counterparts. However, if you’re buying a Canon EOS and going the hybrid route — you plan on shooting a lot of stills in addition to video — you will definitely want some quality, modern Canon glass.
  • Zeiss lenses “produce a colder, contrasty feel. They are incredibly sharp… Be sure to use more fill light when using these lenses and also control your highlights.” Shane’s absolutely right; one of the disadvantages to a DSLR movie when compared to, say, 35mm film is the DSLR has less dynamic range (and, to date, lacks some of the gamma knee options of a sophisticated video camera to control highlights). A very saturated, contrasty lens like the Zeiss would often be an advantage, and I do appreciate their aesthetic (I own a Zeiss set myself), but you have to be even more careful with Zeiss lenses to protect your highlights from blowing out harshly (tip: use the Magic Lantern zebra stripes). Zeiss lenses are famous for having very large, all-metal focus rings with a lot of fluid drag, which many DPs like (I actually find the action a tad too heavy for handheld work), and they share many rendering qualities with Zeiss cine lenses, which is to say: they’re beautiful.
  • Nikon lenses “are sharp with a little softer contrast than the Zeiss lenses.” In my own experience, Nikon lenses are generally the most widely available and least expensive. They have manual apertures and a light touch to their focus rings (which I happen to like, but some don’t), but they have one main problem: their focus rings turn in the opposite direction of every other lens (which can be confusing for operators or focus pullers). This means instead of turning the focus ring clockwise to focus nearer, you turn Nikon lenses counterclockwise. I can’t explain how infuriating this can be if you’re used to the “standard” configuration; there are reversing gears for use on a follow focus, but it’s a consideration regardless.
  • Panavisions, of course, “are the ultimate lenses.” But you can’t afford them (in fact, you can’t even buy them). If your production has a sizable budget and you’re planning on renting equipment (and are shooting on a DSLR for some reason), by all means check them out, but know you’ll need special adapters as well.
  • Leica lensesdelivered beautiful contrast and color throughout. They felt the closest to the Panavision Primo primes and had more of a cinema focus throw, even more than the Zeiss ZE primes. These lenses resolve so well on the big screen.” I haven’t used Leica lenses myself, but shooters love them; there’s some more on Leica lenses in the next section.

Finally, Zeiss has released a complete set of Compact Prime CP.2 lenses tailored for DSLR filmmaking. These lenses are no joke, and as you can see, neither is their price. But compared to, say, their complete set of DigiPrimes, the Compact Prime 2s are a bargain! Especially considering they are Zeiss’s first set of cine lenses to offer full-frame coverage (this means you, 5D Mark II owners, as well as future RED full-framers). So, what are some of the advantages of these Compact Primes? Geared focus and iris rings, smooth aperture adjustment (no mechanical stops), 14 aperture blades (which equals a smoother bokeh than their 9-bladed counterparts), and an interchangeable EOS/PL lens mount — it’s enough to get a filmmaker like myself, who (present guide otherwise excepted) often wants to scream “enough about the minutiae of the technology, how good was the writing?!? And what does it mean?” excited about spending money I don’t have. Here’s the thing to keep in mind with lenses in general: of all of the gear covered in this guide, lenses just might be the best investment, because good optics will never be obsolete. So say you mortgage the house and drop $20k on these Compact Primes? They’ll work on your DSLR, a full-frame RED, a 35mm film camera, and basically any cinema camera going forward (and they hold their value well if you one day decide to, or need to, sell). Just something to keep in mind as you budget for the various components listed here.

  1. There might be exceptions to this rule, but it’s basically true. []
  2. The newest version of the Magic Lantern firmware includes auto rack-focusing as a feature of software; it remains to be seen how practically important it is, but it does offer a compelling reason to stick with Canon autofocus lenses, if you like the idea of automated focus pulls. Personally, I’m not interested, but there may be some follow focus devices coming down the pipeline that use the Canon internal electronics. []

5.Lenses: Adapting, Purchasing

To adapt a different brand of lens to your DSLR, you need a lens adapter. Users report widespread praise for those sold by eBay seller kawaphoto, and my experiences have bore this out (adapting both Olympus and Contax-mount lenses to Canon EOS). Considering some lens adapters run $50+, being able to buy a $10 adapter for every lens in your kit and keeping the adapters on them (preventing you from ever having to interchange them in the field) makes it feasible to base an entire lens kit around glass designed for a different camera, further saving you money. For example, Dan Chung has recommended buying Contax/Yashica-mount Zeiss lenses — less expensive than other Zeiss lenses due to their obsolete nature — and adapting them to Canon.  Dan was one of the earliest adopters of DSLRs for professional video use, and he points out some specific Zeiss/Contax bargains :

  • Zeiss 28mm f2.8
  • Zeiss 50mm f1.4
  • Zeiss 85mm f1.4
  • Zeiss 135mm f2.8
// //

In fact, if you’re interested in Leica lenses — many people say their favorite DSLR video lenses are the Leica R series — here are some good focal lengths to look for:

  • Leica R 28mm
  • Leica R 35mm
  • Leica R 50mm
  • Leica R 60mm
  • Leica R 90mm
  • Leica R 135mm

If you’re wondering what the strange term appended to each Leica lens means, it signifies the speed of the lens: Noctilux are the fastest lenses at f1.2 (sometimes even f0.95!), followed by Summilux at f1.4, Summicron at f2, and Elmarit at f2.8. As you’d expect, the fastest lenses are usually the most expensive (Leica R lens can run a bit more expensive than other brands, so I’ve created custom searches above that focus on Summilux, Summicron, and Elmarit glass). If you put together a kit based on Leica glass, you’ll want to check out Leitax adapters, generally thought of to be the best Leica R-to-Canon adapters.

When adapting any brand (not just Zeiss or Leica) lenses to your DSLR, if you want to use them for still use as well as movie-shooting, there are more expensive adapters that offer an AF-confirm feature. Such adapters contain electronics that allow the camera to confirm (depending on your settings, a red flash in the viewfinder and/or an audible beep) when sharp focus is obtained, even though the lens is of a different brand than the camera. Note that there is often some tweaking necessary with the settings.

Additionally, if you’re going to be shooting stills with fast primes on a 5D you’re probably going to want to swap out the standard focus screen for the Eg-S Super Precision Matte model, which makes objects “pop” into focus a bit more (at the expense of viewfinder brightness — Canon recommends precision screens for lenses f/2.8 and faster).

As I said earlier, lenses hold their value. If you’ve got the money, buy new lenses that are made for your camera — you will avoid a lot of potential pitfalls. For example, Zeiss makes their ZE series of manual lenses specifically for Canon DSLRs; you may want to get these instead of used lenses if you can afford it (for more on why you might want to get Nikon-mount ZF Zeiss lenses instead, see this section. Here’s why: you can definitely get great results finding bargains and adapting older lenses to newer cameras, but you will probably run into some problems along the way. Nothing is free, and if you’re going to buy a used lens for $300 and slap on a $10 adapter, don’t expect it to be every bit as great as its brand-new $1,200 counterpart.

So — what are some of the potential pitfalls of using adapted lenses? There are two main issues to be aware of: infinity focus and mirror obstruction. I’ve had issues obtaining perfect infinity focus using adapted lenses — this is when your lens can focus “past” infinity, causing distant objects to be blurry when they should be sharp — and my 28mm Zeiss lens causes my 5D’s mirror to sometimes get stuck when focused to infinity (more of an issue for shooting stills than movies, since the mirror is in lock-up position in movie mode). Adapting lenses is not for the faint of heart; we’re talking about mechanical devices where millimeters matter, and in many cases individual lenses behave differently with different adapters. For everything gained, something is lost — in this case, you’re gaining a bunch of leftover dollars in your pocket, and losing some reliability and performance. For many shooters, myself included, it’s not a choice: I had to go with adapted lenses as a matter of budget.

Links:  http://nofilmschool.com http://united-creative-artists.co.uk http://www.creativecow.net/

Posted in Canon 5D MK2, Canon 5D mkII, cinematography, DSLR, film, films, indie, Indie Filmmaking, Screenwriting | Tagged , , , , , , , , , , | Leave a comment

Grading, Color Correction and White Balance in Final Cut Pro

Last week, after cocking up a few shots, I had to correct the color balance, and came across this post written By Andrew Balis for Ken Stone.

This was originally related to FCP4, which is now an ancestor as released in 2004, but this still works really well in FCP6 and FCP7.

So, Enjoy, and feel free to post any comment!

JC Leger

The Tools

There are more filters, features and options than can be covered in this article, so we’ll focus on the most important and useful options. As a summary of the items we’ll cover:

  • Color Correction Filters: There are several effects filters that can be applied to a clip to alter its appearance. I’ll stick to just a couple of the most flexible of these filters:
  1. – Color Corrector filter
  2. – Color Corrector 3 Way filter
  • Secondary Controls: These controls, also found in the main color correction filters, are meant to let you affect only a specific color range of the image.
  • Playhead Sync Set To Open: This is a new feature in FCP 4, and can be used to automate the process of opening clips. It’s not only a real timesaver, it’s insurance to making sure you don’t confuse working on the wrong controls.
  • Copy Filter Controls: Integrated controls that are easy to use and a must when color correcting a series of images.
  • Frame Viewer: New to FCP 4, this is a window for comparing and matching different images to one another. Can be set to display a full frame of any image you desire or it can be changed into very customizable split screens of different images. I’ll cover its many cool (and yes, useful too) options in detail.
  • Preset/Custom Window Arrangements: There are two preset arrangements available that lend themselves well to color correction. Additionally, we can customize some windows and save their settings when saving a new window arrangement.
  • Video Scopes: There are four digital video scopes that can be used to monitor and evaluate the video image. We’ll look specifically at the Waveform monitor and Vectorscope.

The Blacks, Mids and Whites

In the next sections we’ll explore the two filters Color Corrector 3 Way and Color Corrector. Before that, let’s take a quick look at how their different filter controls are used to target different components of the video image.

  • Any control labeled as Blacks will primarily affect the darkest portions of the image, such as dark shadows and underexposed objects.
  • Whites: Any control labeled as Whites will primarily affect the brightest parts of the image, the highlights, such as a bright window or a lamp shade.
  • Mids: Controls that affect the Mids target the mid-range portion of the image. Basically, the Blacks and Whites define the darkest and brightest portions of the image, and the Mids affect everything in-between. Its in the Mids where you find the most detail.

Being able to manipulate the image specifically in these three regions gives us a lot of flexibility when re-balancing the contrast or color balance of an image. The next set of images illustrate this well. In the image below, we start with the original, uncorrected shot.
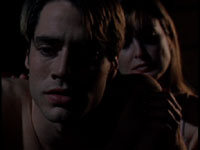
It is a low key scene, dark overall. If we were to use a simple Brightness/Contrast filter to lighten the image, then the image would become mushy, as everything gets brighter, and the shadows are more gray than black. But if the goal is to see more detail in the faces without affecting the shadows, then it would be best to use a filter that has a control for the Mids as it targets the middle gray area, where the faces are. Lightening the Mids can bring up the light level on the face, but leave the dark shadows alone, so the blacks remain black.

Brigtness/Contrast filter
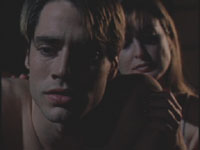
Scene loses contrast, mushy blacks

Color Corrector 3 Way

Scene has more detail, shadows remain sharp

Although the influence of a color correction control for the Blacks, Mids or Whites is greatest in a particular range, all three controls do overlap one another to some degree.
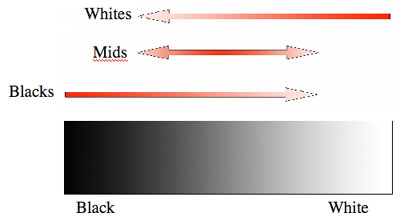
In the above diagram, the black and white gradient represents the range of luminance in the video image. The color correction controls, represented by the arrows, displays the approximate range of the image that each control affects. The bright red indicates the primary influence of the control, and as the red fades, so does the control’s influence. For instance, the control for the Blacks is greatest in the darkest portion of the image, but it still affects brighter shades, just not to the same degree.

Because of this overlap, you may often find that after adjusting one control, you need to go back and fine-tune another control that you previously set.

Color Corrector 3 Way Filter

This is one of two main color correction filters, and probably the one you’ll turn to the most.

To apply this filter, highlight a clip in the timeline and choose Effects menu > Video Filters > Color Correction > Color Corrector 3-Way. By the way, in FCP 4, if a clip in the timeline is not selected, the filter will be placed on any clip at the playhead position (as long as the auto select button for that track is on).

Alternately, you can drag the filter from the Effects tab of the Browser to a clip in the Timeline.

After the filter is added to the clip, open it into the Viewer to make adjustments. If you go to the Filters tab, you can make changes with numerical values. This wouldn’t be a very intuitive way to work, and so we are given a more dynamic and graphical way to work.

Click on the button labeled Visual (on the Filters tab) or click directly on the Color Corrector tab to switch to it.
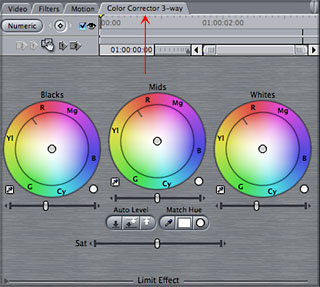
Click on this tab to bring it to the front

Luminance Controls

On the color correction tab, near the top, are three color wheels, each representing the three different parts of the image: Black, Mids, Whites.

To adjust luminance of the Blacks, Mids or Whites, there are sliders under the three color wheels (Red arrows below). Drag the slider left or right.

Tip: Clicking on the little arrows on the ends of the sliders will let you move the sliders in smaller, finer increments.

Think of these luminance sliders as brightness sliders, but they brighten different parts of the image. Dragging a slider left darkens a particular region in the frame. Dragging a slider right brightens that part of the image. Later in the article we’ll explore using the Waveform monitor in conjunction with these luminance controls to compare images and be sure that you’re adjustments are broadcast legal.

Color Balance Controls

Any of the three color wheels can be manipulated by clicking and dragging on the balance indicator found by default in the center of each wheel. Dragging toward any side of the wheel balances color in that direction. The further away from the center that you drag, the more intense the color that you add.

Click and drag

Note: When you first click and drag it may seem as though nothing is moving. Drag in larger increments or hold down the Command key as you drag which will increase the movements you make.

Color Balance

Ok, that’s how to make the adjustments, but not much help if you don’t know what kind of adjustment to make. Next, let’s look at how these controls are used to manipulate the color palette of the scene.

To start, a photographed image has a particular color balance. During photography, if the lighting balance does not match the camera’s white balance or the film stock, and there is no compensation with camera filters, then the image will appear to have a color cast or tint. If the lighting matches the balance of the video camera or film stock, then the scene will have a natural color balance. The light in the scene appears white, or neutral, and all the objects in the scene appear to have a somewhat natural appearance. Below are examples of a neutral color balance (the center image) and images with different color casts. For the purposes of this article, the variations are somewhat extreme.

You may want to enhance a color cast with color correction, or in other scenarios, you may wish to remove one. In addition, aside from any artistic considerations like setting the mood or tone of the scene with color, color balancing is used to match any slight variations in color balance from the multiple angles of a scene so that they appear as a natural continuation of one another.

The Color Wheel

Each of the three color controls is in the shape of a wheel, a color wheel. When we later explore the Vectorscope, we will see a similar type of color wheel used there to monitor the colors of a scene.

A color wheel interface may have many uses, but at the core, it is simply a way to identify different colors, and the different mixtures of colors. The different colors, or hues, are laid out around the wheel.

Color saturation, or color intensity is depicted on a color wheel as the distance outward from the center of the wheel. The further outward on the wheel, the more saturated or intense the color. In the other direction, moving toward the center of the wheel, there is less saturation.

In the Color Corrector 3 Way filter you will find the same six colors (shown above) represented along the wheel, each identified by an abbreviation. Why these six colors and why should you even care? Once you know how dragging a control toward one side of the wheel will affect the balance of colors in the photographed scene, you can begin to have predictable results when color correcting.

To start off, the wheel can first be broken down to identify three main colors, known as primary colors. These are: red, green and blue.

The other three colors on the wheel, yellow, cyan and magenta are each a result of adding two primary colors together. For instance, yellow is a combination of red and green, and therefore found on the wheel between red and green. Notice that on the wheel, directly across from each primary is one of these secondary colors. Any two colors opposite from one another are also known as complementary colors.

These complementary colors, like blue and yellow for example, have a direct impact on one another when color correcting. They not only fall on opposite sides of the wheel, they also act as opposites on one another.
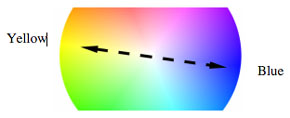
For instance, if you start out with a color in the video that is a saturated blue, then drag a balance indicator toward yellow, the result is a blue with less saturation. In other words, you’re dragging away from blue when you move toward yellow.

Therefore, if your overall scene has a slightly bluish cast, balancing toward yellow a bit will nullify the cast.

Which Color Wheel Do I Use?

We discussed that all three luminance sliders may be needed to re-balance the contrast. In color balancing, it may work a bit differently. We may find only one control needed, or maybe two. In general, you may want to begin with the Mids color wheel, and only use other controls if needed. Why? As the Mids wheel affects the entire mid-range of the program, it will affect all but the brightest highlights and darkest shadows, and in turn, the overall majority of color information in the scene.

Now of course every shot is unique, and the above mentioned approach is quite basic, but may suffice in a lot of scenarios, especially while you’re just getting your feet wet in color correction.

Color Saturation

To adjust the overall saturation of the image use the Sat slider. To decrease saturation, drag to the left, to increase, drag to the right. At extreme left, the image is black and white.

Auto Controls

There are some controls that can help get you “in the ballpark” automatically and instantly.

For luminance, there are controls to automatically set white and black levels. These are found under the Mids luminance slider. Auto black sets the darkest part of the frame, auto white sets the brightest, and auto contrast sets both.

I don’t want to focus on the auto contrast controls as this area is too subjective and can take images to the extreme. Then again, its not a bad idea to see a more extreme correction to compare to a more subtle(manual) correction. Anyway, you can always do an undo.

On the other hand, I find the auto color controls can be very helpful for novices and experts alike. These controls are designed to re-balance the color of the scene for a more natural rendition. This can be very helpful when an image has a slight color shift, but you can’t quite figure out which color. Even when a color tint is intended, it can be a quick way to compare against a more neutral version.

Also, when working with small, subtle shifts in color as our eyes alone may have a hard time detecting the tint. The longer we stare at an image with a color cast, the harder it will be to detect the tint. Our eyes try to adapt! This may be great in real life, but its hardly objective when color correcting. Later we’ll look at other tools at our disposal for helping detect shifts in color, including the Video Scopes and the Frame Viewer.

Next to each color wheel is a small eyedropper. Clicking on an eyedropper makes it active. Start with the eyedropper next to White and click on it.
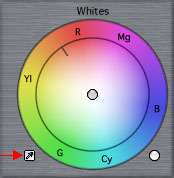
Next, go to the Canvas, and click on a part of the image that should be a neutral white. This will automatically rebalance the image in the highlights, which will also have an impact on the rest of the image. This one control may be all that is needed to create a natural look for color.

If further adjustments are needed, simply go to the particular color wheel and reposition the balance manually. You may also use the eyedroppers under the Mids for middle gray, or the eyedropper under Blacks for the shadows.

Resetting Controls

To reset any one color wheel, click on the white button to the bottom right of the wheel.

Tip: To reset all color wheels, and all luminance adjustments, then Shift/click on the white button next to any of the three color wheels.

Additionally, you can go back to the Filters tab and click on the red X across from the filter to reset all controls on the filter.

Scene to Scene Color Correction

Color correcting one image alone is fine, but what about matching the different shots of a scene? Next is a look at putting together a few different things in FCP to create a workflow when color correcting multiple shots.

1. Set up an external monitor (NTSC or PAL, whatever your final format-even use a regular TV if that’s all you’ve got). This is important as the Canvas window on the computer monitor is not a good reflection of the final display of your program. In FCP 4, pull up a generator clip of Bars and Tone to setup to the external monitor (choose Bars and Tone from the Generator pop up button in the bottom right corner of the Viewer). Then adjust the external monitor (or TV) to the color bars from FCP. For a good description of setting up a monitor to color bars, there is a great online source: go to http://videouniversity.com/tvbars2.htm

2. Set Up FCP Interface. Choose Window > Arrange > Multiple Edits. This re-arranges the windows, and opens up a couple more. If this window arrangement does not appear in the menu, it is because your screen resolution must be set to a horizontal resolution of 1280 or greater. If you want to change the resolution, quit FCP and go to your System Preferences (from the Apple menu). From there, choose Displays, then a resolution and then re-launch FCP.

If your display is unable to be set to 1280 or greater, then the Multiple Edits layout is unavailable (and not seen in the menu), but another layout, almost as good, is available. In this case, in FCP, choose Window > Arrange > Color Correction.

On the other hand, if the Multiple Edits layout is chosen, your screen will look like the following illustration.

At the top of the screen is four windows (from left to right): the Viewer, a Frame Viewer window, the Canvas, and another Frame Viewer window. On the Frame Viewer to the right, notice that the window has two tabs, a Frame Viewer, and behind it, a Video Scopes tab. Click on the Video Scopes tab to bring it to the front.

This will give you a little bit of everything while you work:

  • Viewer: where you’ll make the color correction adjustments.
  • Frame Viewer: where you’ll compare your correction to other images (more on this in a moment).
  • Canvas: where you’ll view your current corrections.
  • Video Scopes: where you’ll evaluate the image (more on this later).

If you use the Color Correction layout (instead of Multiple Edits), then you would simply have one window housing both Frame Viewer and Video Scopes tabs. Simply click on the appropriate tab to access either window as you need.

3. Apply Color Correction. Highlight all the clips in the scene to be corrected (in the Timeline). Choose Effects > Video Filters > Color Correction > Color Corrector 3 Way. There are good reasons why we want to apply a filter to all the clips in advance, as we will examine next.

4. Set Playhead Sync To Open. From the new Playhead Sync button in the Viewer or Canvas, choose Open from the pop up menu. This automates the process of opening clips into the Viewer.

Once set to Open, the symbol on the button will look like the next illustration.

In the Timeline, move the playhead forward or back to other clips. As you do so, notice that the clip at the playhead position is automatically opened into the Viewer. In the Viewer, click on the Color Corrector tab to bring it to the front. As each clip already has a color correction filter (and tab), then as you move from clip to clip in the timeline, that particular clip is opened, and the color corrector tab is brought to the front. This means that you can look at an image in the Canvas, and immediately move to the color correction controls in the Viewer. You won’t have to worry about opening the clip or working on the controls of the “right” clip, as whatever is in the Canvas is also automatically in the Viewer.

5. Making Comparisons.

When trying to match to images to one another, there is nothing more handy than the new Frame Viewer window. If you choose the Multiple Edits or Color Correction window layout you open a Frame Viewer (although they open with different default settings). A Frame Viewer can be set to display one or two images, depending on what is chosen from the two drop down menus found at the bottom of the Frame Viewer. One helpful configuration for color correction is to set the left menu to Previous Edit and the right menu to Current. Correspondingly, you would then see a split screen of the clip to the left of the timeline playhead and the current clip at the playhead, as shown next.

What’s even better? You can click and drag on the corners of the split screen or click and drag over one side to slide it one way or another. Whatever the content of the two clips, these options help you to compare different parts of each clip, to get just the comparison you want.

The buttons at the bottom of the Frame Viewer are also a quick way to jump into a vertical or horizontal split screen, or reverse the layout of the two images in the split screen.

The other options found in the two drop down menus are helpful for a variety of scenarios. Here’s just a couple: One of the options from either menu is Current w/o Filters. Choosing this is a great way to quickly see the original image when designing a look, especially if the look involves using several filters together. Then, this Frame Viewer option is a much quicker way to see the original without disabling several filters.

Another helpful option from a Frame Viewer menus is In or Out. If you Set a timeline In point then choose In from a Frame Viewer menu, you can view any frame from any point in the timeline, instead of just the presets found in the menu.

Below is a list of options found under the “left” menu in the Frame Viewer.

6. Color Matching.

We also have a quick way of copying the filter settings from one clip to another. This is helpful when multiple clips in the timeline are shot under similar lighting and/or exposure. Even when the exposure (or color) varies a bit from shot to shot, you might still find that a previous color correction done in the same scene can at least be used for a starting point for correcting another shot.

At the top/left of each Color Corrector tab in the Viewer, notice the Copy Filter controls. They are the little arrows with 1 or 2, on either side of a little hand icon.

In brief, if you click on an arrow to the left of the hand, it copies the settings of a previous clip (the first or second clip to the left in the Timeline). If you click on an arrow to the right of the hand, then it copies the settings of the current clip to one of the next clips in the Timeline (first or second clip to the right).

The hand is a “drag filter” control. Click and drag on the hand to another clip in the timeline. This copies the entire filter (not just the settings) to the clip. Just be careful when using this, click and hold, then drag to a timeline clip. If you accidentally click and let go on the hand, then the filter is copied back onto the same clip (which of course makes the result on the original clip too heavy). This drag filter control is helpful when you want to copy the color correction to a clip beyond the 1 or 2 clip range of the arrow controls.

7. Other Color Matching Options. Paste attributes is another option for copying color correction from one clip to others. Paste Attributes is handy when the color correction is to be applied beyond the range of the arrow copy controls, or when you want to copy multiple filters together. Highlight the clip in the timeline with the finished color correction. Copy it (Command/C). Then select the clips to receive the color correction and choose Edit > Paste Attributes (or Option/V). In the dialog box that opens, select a checkbox next to Filters (unless its already turned on by default!) and click Ok.

Secondary Color Correction

This type of color correction refers to being able to adjust one color value in a scene without affecting other colors, also referred to as selective color correction. This can be used to change the color of a sky or intensify the blue in a sky without affecting the rest of the scene. It can be used to change any colored object in an image, like a shirt, from one color to another.

This technique is similar to blue screen effects, where the blue screen is keyed out (made transparent) to replace the blue background with another scene.

To perform this color correction, we can use the Color Corrector 3 Way or Color Corrector filters. The controls are the same for each filter. I like the Color Corrector filter for this, as it gives a lot of flexibility for modifying the chosen color, even if the desired color shift is substantial.

Color Corrector Filter

This filter is similar in many of the controls found in the Color Corrector 3 Way, but it also gives a slightly different approach to color balance and hue.

The controls that work similarly are shown below. There are three luminance sliders and a saturation slider

The other controls, for color, are setup as shown below. This type of color correction is more basic than the Color Corrector 3 Way, as there is only one Color Balance wheel, and this wheel affects the overall color balance, instead of affecting the balance in just the Whites, Mids or Blacks.

There is also a Hue color wheel, and the wheel is controlled by dialing clockwise or counter-clockwise. This can be used alone or in conjunction with the Color Balance wheel.

The Hue wheel basically re-maps color around the color wheel. One way to demonstrate how the Hue wheel works is viewing color bars with this Color Corrector filter. We’ll focus just on the red bar of the color bars. The next three illustrations next show the red bar, and where it falls on our reference color wheel, and where it would be found in the vectorscope (which will be explored in more depth later).

When dialing a bit clockwise around the Hue wheel, the red bar becomes magenta.

This can be explained by the next set of illustrations, which shows the direction the control is dialed, the resulting color as it travels around the color wheel and the vectorscope.

To Begin Secondary Color Correction

Apply the Color Corrector filter to a clip, and click on the Color Corrector tab. At the bottom/left corner of the window is a little disclosure triangle, then the words Limit Effect.

Click on the disclosure triangle and the Limit Effect section pops open.

All of the controls under Limit Effect help us define what color in the frame we want to apply an effect. Once we select a color, then any changes made in the top part of the filter only apply to the selected color.

Define The Color To Be Manipulated

Click on the eyedropper under Limit Effect to make it active.

Then click in the canvas on the colored object that you want to affect. This sets the three controls under Limit Effect to define this particular color. Chances are, you will still need to make adjustments before this color is accurately defined.

To see if the color is properly keyed(defined), click on the little key button under Limit Effect. Clicking it once will turn the key’s background from gray to white.

The image in the Canvas will be displayed in black and white. White will represent the keyed color, and black will represent sections not selected.

Note: To return the Canvas back to view the ÒfinalÓ image, click on the key twice more (once to change key background to blue, then click it again and the key background goes back to gray).

On the sample below, on the left you see the original image. The object that is being selected is the blue bottle.

In the next image on the left, you see the selection chosen with the eyedropper (when the key button is white). It has only selected part of the bottle label that I wanted to affect. To select the entire object, we will need to expand the selection. when finished, the selection should look like the image on the right.

To accomplish this, you can try “adding” to the selection using the eyedropper again, or you can manually modify the ranges at the bottom of the filter. Since the eyedropper is so simple and effective, I would suggest this route first.

After the initial selection is made with the Limit Effect eyedropper, then click on the eyedropper again to make it active. This time, before clicking in the Canvas, hold down the Shift key. When you then click on a new area, that color sample is added to the selection. You can keep Shift/clicking until almost the entire object (color) is chosen. Just remember to hold down the Shift key each time before you click in the Canvas or you’ll end up replacing the selection, not adding to it.

The other way to modify the selected color is to use the handles found in each of the three regions in the Limit Effect section.

If part of the object is darker than the part selected, expand the selection under the Luma control to include that darker shade of the color. If part of the color is a slightly different hue, then expand the Color Selection. If part of the color is more saturated than the selection, then expand the Saturation selection.

To make an adjustment, we can drag the top handles, the bottom handles, or drag the range displayed.

The top handles of a control adjust the overall range also called Tolerance. The bottom handles adjust the Softness of the selection, which basically feathers out the selection softer than the top handles.

You may also click and drag in the bar itself to drag the overall selection left or right. The cursor will turn into a little hand while you are over the bar.

Continue to adjust any or all controls until the white part of the Canvas is accurately representing the entire object. I tend to find that there is less science here, and more test-and-see to make it work. Adjust the top handles of all three controls until the object is almost fully white. Then go back and adjust the bottom handles to feather out the selection to completely define the object.

Making Secondary Corrections

Once you make a selection, any or all of the checkmarks will be checked in the Limit Effect section. As long as these checkmarks are checked, then any corrections in the top of the filter are limited to only the selected color.

You can use contrast and/or color controls to modify the chosen color. When you need to make a drastic change in color, then the Hue wheel might provide the best approach. In the following example, the blue bottle is made purple. This is a fairly dramatic change, but it could have also been a more subtle adjustment.

Cleaning Up the Edges

Once you start to make your desired color change, you will see how the selection holds up around the edges of the chosen color. Similar to keying, you may need to treat the edges in an attempt to distract the audience’s attention to the least realistic part of the effect.

Two sliders at your disposal, at the bottom of the Limit Effect section.

Softening is used to soften the edges of the selection. A little bit goes a long way. Edge Thin is also helpful as a way to subtly expand or contract the overall selection. Use this slider in conjunction with Softening.

For everyday tasks like tweaking a sky’s color a little bit, or slightly enhancing the green of grass, or warming up skin color without an impact on the rest of the scene, we will find that our color selection does not need to be very precise or clean. As the color adjustments are subtle, a quick, rough selection is fine. If the desired color adjustment is substantial, then the selection of the color needs to be fairly precise. If it is not, then you may produce a sort of halo, a colored edge. Or you may see “holes” in the selection, where the holes are a different color.

Also, just a quick note about what to expect and what not to expect. With secondary color correction, its somewhat effortless to make subtle color or luminance shifts with a variety of video formats, including DV, but if you need large shifts in color, and its critical that the edges of the “selection” look realistic and believable, then in general, you should have one or more factors working for you.

1. Manipulating a color that’s fairly unique in the frame (or can be isolated easily with a matte). This is made substantially easier when the object to be affected has a dense color saturation and is evenly exposed. That means a more uniform lighting of the object, and exposed somewhere near the middle range on the luminance scale.

2. Working within a 4:2:2 color space. This includes working with digital video formats including:

  • Digital Betacam
  • DVC Pro 50
  • High Definition

This also includes film telecined to one of these digital formats.

Since you can’t end up with better resolution than the weakest link in your post production workflow, then its also important to capture and work with these formats through one of the following methods:

  • A capture card that allows for uncompressed capture of the material, such as:

– Blackmagic’s Decklink(with Blackmagic’s or Apple’s codecs)

– AJA’s Kona

  • DVC Pro 50 can be captured natively through FireWire on such equipped decks (very cool!) And, not to be left out in the rain, in the analog world, Beta SP masters also can do well if digitized uncompressed through a capture card.

In the previous example of the bottle, this footage was originally shot on film but ultimately transferred to DV. Although DV, this still worked well as there is no other remotely similar color in the frame to the blue, and the edges are somewhat dark. So, all in all it depends on what you’re trying to do, the limits of the format, but also the content of the shot and how isolated the color is.

Creating the Pleasantville Look

Creating a black and white image with only one colored object is similar to the process above, with a couple of distinctions. First, select the color that should remain in color, using the controls under Limit Effect to define the color as we did above.

Once the color is defined, then click on the Invert button under Limit Effect.

Now, instead of the individual object being selected, the entire image except that object is selected. Go up to the Saturation slider in the color correction controls, and drag all the way to the left, as shown below.

The entire image will become black and white except for that one color.
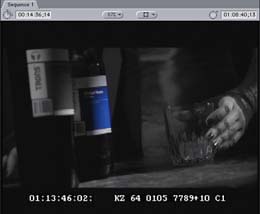
Next, there are more examples of secondary color correction, but this time, the colored object changes hue, and is less saturated. The way this is accomplished is by adding a second Color Corrector filter after the first filter.
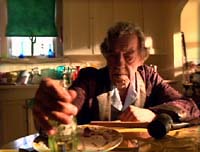
Image before color correction

The first filter is used to isolate the color, and turn the scene black & white except for the one color. This can be either the Color Corrector 3 Way or the Color Corrector filter. After selecting the color with Limit Effect controls and clicking on the Invert button, drag the Sat slider all the way to the left.

A second filter could then be applied. This would be a good one for the Color Corrector filter and its Hue wheel. Dialing the Hue wheel will change the chosen color, the only color left in the frame.

When using color correction, we can always apply one filter over another for even more control than a single filter can give us.

Keeping It Legal

I know I’ve so far neglected to mention anything about FCP’s video scopes. Maybe you were hoping I’d forget. Then again, I guess it would be just as easy for you to just close this article away at this point, but don’t… just yet. This next part is kind of important.

We can use the video scopes two ways. For one, it can help us identify and compare components of our images. Just how much of a color tint? Or, how bright is the window in the background compared to the window from another similar shot? We’ll come back to this in a minute.

The other, and more primary use of the video scopes is to determine whether our images fall within certain specifications. Often referred to as “broadcast legal”, its about keeping luminance levels within a certain range and keeping a cap on color saturation. This not only ensures that the image is viewed as well as it can on a variety of televisions, but that it adheres to the standards of the broadcaster. We will look at some general standards, but you should check with the intended broadcaster to be sure of all requirements that they have.

To begin, if you have the Mutliple Edits or Color Correction window arrangement, then the video scopes window is already open.

Opening the window will bring up a 4-up display showing all four monitors. We will only be concerned with the Waveform monitor and Vectorscope. Toggling down the drop down menu in the window will let you choose between the various scopes, like a full window of the waveform monitor.

I personally like to see two full window displays, one of the Waveform monitor and one of the Vectorscope. You can do this easily. After opening the Video Scopes window, go back to the Tools menu, and choose Video Scopes again. This will open a separate scopes tab on to the Tool Bench window. Click on the tab of the newly opened scopes tab, and drag it away from the main window. This “breaks off” this tab, and now you have two different windows, where they can each be set separately.

Click and drag on tab to separate into another window

The Waveform Monitor

From the Layout menu in the video scopes, choose Waveform.

This display is used to evaluate the brightness range of the image. The scale along the left side of the window spans from Black to White, corresponding to 0 to 100. Depending on an object’s brightness, it will be plotted out as dots somewhere along this scale. For instance, a bright window is displayed as dots near the top of the scale, in this case, topping out below the line for White.

To keep our image within an acceptable range, for NTSC or PAL, we want the darkest blacks of the frame to map to Black (0). We want the brightest white to top out at White (100) and not go above. That’s the basic mantra to keep in mind: keep it between 0 and 100.

Note: If you’re the curious type, or you’ve heard that in NTSC black should be set to 7.5 IRE, than you may wonder about the soundness of my previous advice. Without going into much detail, terms like 7.5 IRE, setup level or black level are completely irrelevant when working inside FCP. These are analog terms, not to be confused with how FCP reads and displays information, which is as digital percentages. When recording to digital mediums, NTSC and PAL considerations are not different from one another. Black is 0%. Period. If you really want a more detailed rant on the subject, you can read the article at Ken’s site for FCP 3 that I did last year (which, in retrospect, was a little too much info for the article).

To understand better how the waveform monitor represents or corresponds to the video image, let’s look at the next two images.

On the left is the video image, with highlights and shadows. In the image to the right is the waveform display of the video. The Waveform monitor displays information from left to right in the same relationship as the video. More specifically, in this example, the window is on the left side in the video frame, and is the same distance inwards from the left in the waveform display. The shadow on the man’s robe, which is close to the right side of the frame, is seen in the Waveform monitor near the right side of the screen.

Tip: To keep imported graphics and FCP generators (like text) from blooming too brightly for NTSC, then go to the Sequence Settings > Video Processing tab, and choose Process Maximum White As: White.

The Vectorscope

This tool behaves similarly in the analog world and in FCP.

Color saturation (and hue) may be examined on a vectorscope. It is basically a color wheel representing the three primary colors (red, green and blue) and the secondary colors (yellow, cyan and magenta). When there is a color in the frame, it will be represented on the vectorscope going in the direction of that side of this color wheel. The following is an illustration of an image that has a lot of red values in the frame. The vectorscope shows a majority of its values along the red side of the color wheel. Additionally, the more saturated a color, the more it stretches out away from the center to the edges of the color wheel. The less saturated a color, the closer it will be toward the center of the wheel.

To determine legal saturation levels, we will want to look at the color “targets” along the vectorscope. These targets are used for calibrating color bars, but they also serve as the limits for our color saturation. In general, we do not want any color’s saturation to ever extend past the center of the target along any sides of the vectorscope.

This is the target for the color Yellow

Tip: Additionally, for a more detailed view of the center portion of the vectorscope, Control/click anywhere over the vectorscope and choose Magnify from the drop down menu.

We can also use the vectorscope to aid in color correcting single or multiple images.

Not only will it display whether colors are legal, but it helps to eliminate color casts. You may look at an image and know that it is a little off, but exactly what color is the image leaning toward? You can see this on the vectorscope, as the main grouping of spikes will lean toward the balance of the image. In the color correction filter, drag toward the opposite side of the wheel as the direction of color in the Vectorscope.

You can also use this to as a guide to help balance several images to one another, as you don’t have to rely on the accuracy of your eye as much. Look at the vectorscope display of one image, and compare the color display to that of another image.

Broadcast Safe Filter

This is an interesting filter that is also included in the Color Correction Bin. The purpose of this filter is to limit the top end of an image, the white values. Using this filter can help to clamp values above a certain point, to ensure that you are still “legal”. I find it very important to have the waveform monitor open while making adjustments with this filter. I think that people tend to think of this very literally as a “Legalize” filter, and do not contemplate just exactly how it is “legalizing” the image.

This filter approaches the task by taking values above a certain point and clamping them, or “cutting them off”. It also will give you the flexibility of determining just where that cut off point is, as well as where it starts to pull higher end values down the scale, so basically shifting the high end a little darker.

You should use this filter with caution. If you color correct so that a majority of the highlights fall fairly high on the scale, above 100, and then apply this filter to cut off the top end, you may end up with undesirable results. This will cause a flattening of the image in the highlights, which appears as dull, flat sections of white, instead of gradations of highlights. This is similar to what you will find when over-exposing while shooting video. There will be blanket areas of white, with no detail in them.

Highlights with Gradation
Flat Highlights

When using this filter, I suggest that instead the whites should roll off a bit, before being clamped. This can be done while using the Color Corrector 3 Way or Color Corrector filter. Adjust the highlights so that the majority of spikes fall below 100. If the top end of a few spikes still fall above 100, but you are happy with the image as a whole, then this would be the time to apply the Broadcast Safe filter.

On the Filters tab, there are several options, but the default is often sufficient.

If you feel brave, then you can set the drop down menu to Custom. Once this is set, use the controls under Luminance and Saturation Limiting to control the clamping point, adjust the range of the falloff, and where the top end sits on the scale.

As mentioned above, this filter should be used with caution when trying to create natural scenes. It is generally more pleasing to see gradation in the highlights, even if it is subtle. If one of the reasons for raising the white levels was to bring more contrast into the scene, then this can better be accomplished by a well balanced scene, then by overdoing the whites. Having a true black in the frame along with a true white will give the image more punch, and more of a feeling of intense white in the highlights.

On the other hand, the Broadcast Safe filter is a great aid when trying to create high contrast looks. With a color corrector filter, then a Broadcast Safe filter, you can keep pushing up the Mids and Whites sliders without the whites going above 100.

A Final Note

For even more detail than this article, as well as how to use several additional features, more tips and for some real-world examples to practice on, I hope you check out the just released book Advanced Editing and Finishing Techniques in Final Cut Pro 4 from Peachpit Press. In there I wrote five chapters on color correction, and there is enough media examples and exercises on the included DVD to hopefully keep you busy for a while.

Written by Andrew Balis

Andrew Balis is a cinematographer, editor, post production consultant and Apple certified instructor teaching classes in Final Cut Pro to industry professionals at Moviola Education and UCLA. He is co-author of the Apple Pro Series book Advanced Editing Techniques in Final Cut Pro 4. Andrew co-authored the original Apple certified curriculum for beginner, advanced, and effects classes developed at Moviola Education, and wrote the Final Cut Pro curriculum for the Apple Education/CNN Video Journalism classes offered in the K-12 market.

Posted in film, films, indie, Indie Filmmaking, Screenwriting | Tagged , , , , , , , , , , | Leave a comment

A PRACTICAL GUIDE TO THE HERO WITH A THOUSAND FACES, WRITTEN BY JOSEPH CAMPBELL, ANALYSE BY CHRISTOPHER VOGLER

In the long run, the most influential book of the 20th Century may turn out to be Joseph Campbell’s THE HERO WITH A THOUSAND FACES.

It’s certainly true that the book is having a major impact on writing and story-telling, but above all on movie-making. Aware or not, filmmakers like John Boorman, George Miller, Steven Spielberg, George Lucas, and Francis Coppola owe their successes to the ageless pattern that Joseph Campbell identifies in the book.

The ideas in the book are an excellent set of analytical tools.
`
With them you can compose a story to meet any situation, a story that will be dramatic, entertaining, and psychologically true.

With them you can always determine what’s wrong with a story that’s floundering, and you can find a better solution to almost any story problem by examining the pattern laid out in the book.

The Writers Journey with Christopher Vogler There’s nothing new in the book. The ideas in it are older than the Pyramids, older than Stonehenge, older than the earliest cave painting.

Campbell’s contribution was to gather the ideas together, recognize them, articulate them, name them. He exposed the pattern for the first time, the pattern that lies behind every story ever told.

Campbell is a mythographer — he writes about myths. What he discovered in his study of world myths is that THEY ARE ALL BASICALLY THE SAME STORY — retold endlessly in infinite variation.

He discovered that all story-telling, consciously or not, follows the ancient patterns of myth, and that all stories, from the crudest jokes to the highest flights of literature, can be understood in terms of the “HERO MYTH”; the “MONOMYTH” whose principles he lays out in the book.

Campbell was a student of the Swiss psychologist Carl Jung, and the ideas in THE HERO WITH A THOUSAND FACES are often described as Jungian.

The book is based on Jung’s idea of the “Archetypes” constantly repeating characters who occur in the dreams of all people and the myths of all cultures.

Jung believed that these archetypes are reflections of the human mind — that our minds divide themselves into these characters to play out the drama of our lives.

The repeating characters of the hero myth, such as the young hero, the wise old man, the shape-shifting woman, and the shadowy nemesis, are identical with the archetypes of the human mind, as shown in dreams. That’s why myths, and stories constructed on the mythological model, are always psychologically true.

Such stories are true models of the workings of the human mind, true maps of the psyche. They are psychologically valid and realistic even when they portray fantastic, impossible, unreal events.

This accounts for the universal power of such stories. Stories built on the model of THE HERO OF A THOUSAND FACES have an appeal that can be felt by everyone, because they spring from a universal source in the collective unconscious, and because they reflect universal concerns. They deal with universal questions like “Why was I born?” “What happens when I die?” “How can I overcome my life problems and be happy?”

The ideas in the book can be applied to understanding any human problem. They are a great key to life as well as being a major tool for dealing more effectively with a mass audience.

Christ, Hitler, Mohammed, and Buddha all understood the principles in the book and applied them to influence millions.

If you want to understand the ideas behind the HERO MYTH, there’s no substitute for actually reading the book. It’s an experience that has a way of changing people. It’s also a good idea to read a lot of myths, but it amounts to the same thing since Campbell spends most of the book illustrating his point by re-telling old myths.

Campbell gives a condensed version of the hero myth on p. 245. However, since he uses some specialized technical terms that require going back to his examples in earlier chapters to find out what he’s talking about, I’ve taken the liberty of amending his outline slightly, re-telling the hero myth in my own way. Feel free to do the same. Every story-teller bends the myth to his own purpose.

That’s why THE HERO HAS A THOUSAND FACES

The stages of the HERO are:
1) THE HERO IS INTRODUCED IN HIS ORDINARY WORLD.

Most stories take place in a special world, a world that is new and alien to its hero. If you’re going to tell a story about a fish out of his customary element, you first have to create a contrast by showing him in his mundane, ordinary world. In WITNESS you see both the Amish boy and the policeman in their ordinary worlds before they are thrust into alien worlds — the farmboy into the city, and the city cop into the unfamiliar countryside. In STAR WARS you see Luke Skywalker bored to death as a farmboy before he takes on the universe.
2) THE CALL TO ADVENTURE.

The hero is presented with a problem, challenge, or adventure. Maybe the land is dying, as in the Arthur stories about the search for the Holy Grail. In STAR WARS again, it’s Princess Leia’s holographic message to Obi Wan Kenobi, who asks Luke to join in the quest. In detective stories, it’s the hero accepting a new case. In romantic comedies it could be the first sight of that special — but annoying someone the hero or heroine will be pursuing/sparring with the remainder of the story.
3) THE HERO IS RELUCTANT AT FIRST.

Often at this point, the hero balks at the threshold of adventure. After all, he or she is facing the greatest of all fears — fear of the unknown. At this point Luke refuses Obi Wan’s call to adventure, and returns to his aunt and uncle’s farmhouse, only to find they have been barbqued by the Emperor’s stormtroopers. Suddenly Luke is no longer reluctant, and is eager to undertake the adventure. He is motivated.
4) THE HERO IS ENCOURAGED BY THE WISE OLD MAN OR WOMAN.

By this time many stories will have introduced a Merlin-like character who is the hero’s mentor. In JAWS it’s the crusty Robert Shaw character who knows all about sharks; in the mythology of the Mary Tyler Moore Show, it’s Lou Grant. The mentor gives advice and sometimes magical weapons. This is Obi Wan Kenobi giving Luke Skywalker his father’s light sabre.

The mentor can only go so far with the hero. Eventually the hero must face the unknown by himself. Sometimes the wise old man is required to give the hero a swift kick in the pants to get the adventure going.
5) THE HERO PASSES THE FIRST THRESHOLD.

He fully enters the special world of his story for the first time. This is the moment at which the story takes off and the adventure gets going. The balloon goes up, the romance begins, the plane or spaceship blasts off, the wagon train gets rolling. Dorothy sets out on the Yellow Brick Road. The hero is now committed to his journey… and there’s no turning back.


6) THE HERO ENCOUNTERS TESTS AND HELPERS.

The hero is forced to make allies and enemies in the special world, and to pass certain tests and challenges that are part of his training. In STAR WARS, the cantina is the setting for the forging of an important alliance with Han Solo, and the start of an important enmity with Jabba The Hut. In CASABLANCA, Rick’s Cafe is the setting for the “alliances and enmities” phase, and in many westersn it’s the saloon where these relationships are established.

The tests and challenges phase is represented in STAR WARS by the scene of Obi Wan teaching Luke about the Force, as Luke is made to learn by fighting blindfolded. The early laser battles with the Imperial Fighters are another test which Luke passes successfully.
7) THE HERO REACHES THE INNERMOST CAVE

The hero comes at last to a dangerous place, often deep underground, where the object of his quest is hidden. In the Arthurian stories the Chapel Perilous is the dangerous chamber where the seeker finds the Grail. In many myths the hero has to descend into hell to retrieve a loved one, or into a cave to fight a dragon and gain a treasure. It’s Theseus going into the Labyrinth to face the Minotaur. In STAR WARS it’s Luke and company being sucked into the Death Star where they will rescue Princess Leia. Sometimes it’s the hero entering the headquarters of his nemesis; and sometimes it’s just the hero going into his or her own dream world to confront his or hers worst fears… and overcome them.


8) THE HERO ENDURES THE SUPREME ORDEAL.

This is the moment at which the hero touches bottom. He faces the
possibility of death, brought to the brink in a fight with a
mythical beast. For us, the audience standing outside the cave
waiting for the victor to emerge, it’s a black moment. In STAR
WARS, it’s the harrowing moment in the bowels of the Death Star,
where Luke, Leia and company are trapped in the giant trash-masher.
Luke is pulled under by the tentacled monster that lives in the
sewage, and is held down so long the audience begins to wonder if
he’s dead. E.T. momentarily appears to die on the operating table.

This is a critical moment in any story, an ordeal in which the hero appears to die and is born again. It’s a major source of the magic of the hero myth. What happens is that the audience has been led to identify with the hero. We are encouraged to experience the brink-of- -death feeling with the hero. We are temporarily depressed, and then we are revived by the hero’s return from death.

This is the magic of any well-designed amusement park thrill ride. Space Mountain or The Great White Knuckler make the passengers feel like they’re going to die, and there’s a great thrill that comes from surviving a moment like that. This is also the trick of rites of passage and rites of initiation into fraternities and secret societies. The initiate is forced to taste death and experience resurrection. You’re never more alive than when you think you’re going to die.
9) THE HERO SIEZES THE SWORD.

Having survived death, beaten the dragon, slain the Minotaur, the hero now takes possession of the treasure he’s come seeking. Sometimes it’s a special weapon like a magic sword, or it may be a token like the Grail or some elixer which can heal the wounded land.

Sometimes the “sword” is knowledge and experience that leads to greater understanding and a reconciliation with hostile forces.

The hero may settle a conflict with his father or with his shadowy nemesis. In RETURN OF THE JEDI, Luke is reconciled with both, as he discovers that the dying Darth Vader is his father, and not such a bad guy after all.

The hero may also be reconciled with a woman. Often she is the treasure he’s come to win or rescue, and there is often a love scene or sacred marriage at this point. Women in these stories (or men if the hero is female) tend to be SHAPE-SHIFTERS. They appear to change in form or age, reflecting the confusing and constantly changing aspects of the opposite sex as seen from the hero’s point of view. The hero’s supreme ordeal may grant him a better understanding of women, leading to a reconciliation with the opposite sex.
10) THE ROAD BACK.

The hero’s not out of the woods yet. Some of the best chase scenes come at this point, as the hero is pursued by the vengeful forces from whom he has stolen the elixir or the treasure. This is the chase as Luke and friends escape from the Death Star, with Princess Leia and the plans that will bring down Darth Vader.

If the hero has not yet managed to reconcile with his father or the gods, they may come raging after him at this point. This is the moonlight bicycle flight of Elliott and E.T. as they escape from “Keys” (Peter Coyote), a force representing governmental authority. By the end of the movie, Keys and Elliott have been reconciled, and it even looks like Keys will end up as Elliott’s father. (The script not the final cut, guys).
11) RESURRECTION.

The hero emerges from the special world, transformed by his
experience. There is often a replay here of the mock
death-and-rebirth of stage 8, as the hero once again faces death and
survives. Each ordeal wins him new command over the Force. He is
transformed into a new being by his experience.
12) RETURN WITH THE ELIXIR.

The hero comes back to his ordinary world, but his adventure would be meaningless unless he brought back the elixir, treasure, or some lesson from the special world. Sometimes it’s just knowledge or experience, but unless he comes back with the exlixir or some boon to mankind, he’s doomed to repeat the adventure until he does. Many comedies use this ending, as a foolish character refuses to learn his lesson and embarks on the same folly that got him in trouble in the first place.

Sometimes the boon is treasure won on the quest, or love, or just the knowledge that the special world exists and can be survived.

Sometimes it’s just coming home with a good story to tell.
THE SHORT FORM OF THE HERO STORY:

The hero is introduced in his ordinary world, where he receives the call to adventure. He is reluctant at first but is encouraged by the wise old man or woman to cross the first threshold, where he encounters tests and helpers. He reaches the innermost cave, where he endures the supreme ordeal. He seizes the sword or the treasure and is pursued on the road back to his world. He is resurrected and transformed by his experience. He returns to his ordinary world with a treasure, boon, or elixir to benefit his world.

As with any formula, there are pitfalls to be avoided. Following the guidelines of myth too rigidly can lead to a stiff, unnatural structure, and there is danger of being too obvious.

The HERO MYTH is a skeleton that should be masked with the details of the individual story, and the structure should not call attention to itself. The order of the hero’s stages as given here is only one of many variations. The stages can be deleted, added to, and drastically reshuffled without losing their power.

The values of the myth are what’s important. The images of the basic version — young heroes seeking magic swords from old wizards, fighting evil dragons in deep caves, etc., — are just symbols, and can be changed infinitely to suit the story at hand.

The myth is easily translated to contemporary dramas, comedies, romances, or action-adventures by substituting modern equivalents for the symbolic figures and props of the hero story. The Wise Old Man may be a real shaman or Wizard, but he can also be any kind of mentor or teacher, doctor or therapist, crusty but benign boss, tough but fair top sargeant, parent, grandfather, etc. Modern heroes may not be going into caves and labyrinths to fight their mythical beasts, but they do enter an innermost cave by going into space, to the bottom of the sea, into their own minds, or into the depths of a modern city.

The myth can be used to tell the simplest comic book story or the most sophisticated drama. It grows and matures as new experiments are tried within its basic framework. Changing the sex and ages of the basic characters only makes it more interesting, and allows ever more complex webs of understanding to be spun among them. The basic characters can be combined, or divided into several figures to show different aspects of the same idea. The myth is infinitely flexible, capable of endless variation without sacrificing any of its magic.

And it will outlive us all.

About The Author

Christopher Vogler Christopher Vogler is a veteran story consultant for major Hollywood film companies and a respected teacher of filmmakers and writers around the globe. His book “The Writer’s Journey”, applying the ancient patterns of myth to modern story-telling, has helped to shape the way people in movies, TV, and publishing think about stories and is required reading at many film schools and literature programs. He has influenced the screenplays of movies from THE LION KING to FIGHT CLUB to THE THIN RED LINE and most recently wrote the first installment of RAVENSKULL, a Japanese-style manga or graphic novel. He was the executive producer of the feature film P.S. YOUR CAT IS DEAD and writer of the animated feature JESTER TILL.

A native of St. Louis and a graduate of the University of Missouri School of Journalism, he served as a U. S. Air Force officer and made documentary films on the military space program before doing graduate work at the University of Southern California film school. He started work in the film industry as a story analyst for Twentieth Century Fox and other major studios. He was part of the animation story staff at Disney while THE LION KING, ALADDIN, HERCULES, and MU-LAN were being developed. His book “The Writer’s Journey” grew out of a short memo he wrote while at Disney, pointing out the usefulness of Joseph Campbell’s concept of the “Hero’s Journey”. Recently he has consulted on films such as 10,000 BC, HANCOCK, I AM LEGEND, Darren Aronofsky’s THE WRESTLER, the KARATE KID remake, and Helen Hunt’s directorial debut, THEN SHE FOUND ME.

What do you think of this essay?

Please feel free to post any comment!

Posted in film, films, indie, Indie Filmmaking, Screenwriting | Tagged , , , , , | Leave a comment